
 Automated online proctoring
Overview
How to use a D2L quiz (with Respondus LockdownBrowser/Monitor enabled) to launch a LON-CAPA quiz or exam.
A course is automatically created in D2L for every MSU course section, but the instructor needs to activate the course in order for it to be available to students.
In order to leverage the automated online proctoring capabilities of Respondus Monitor with a LON-CAPA quiz or exam, the following need to be in place:
- A "tiny" URL needs to have been created for an entry point in the LON-CAPA course (e.g., for an exam folder).
- A key and secret for use when launching a LON-CAPA session from D2L need to have been created in the LON-CAPA course.
- A deeplink parameter needs to have been set at an enclosing map/folder level for questions in the exam folder in LON-CAPA, and set to require link protection and launch from D2L.
- A quiz needs to have been created in the D2L course containing a single quiz question which contains a link to the External Tool (i.e., a URL for the LON-CAPA entry point).
The protocol which permits use of an External Tool in D2L to launch access to LON-CAPA is the Learning Tool Interoperability (LTI) standard, and in this context, D2L is the Tool Consumer and LON-CAPA is the Tool Provider. In other contexts, such as the use of the Examity online proctoring service for LON-CAPA exams, LON-CAPA is the Tool Consumer and Examity is the Tool Provider.
Step-by-step instructions:
(a) In the LON-CAPA course ...
- Tasks to complete using the Course Editor
- Tasks to complete using Settings > Course Settings
- Tasks to complete using the Parameter Manager
- Tasks to complete using People > Users > Add/Modify a Student
(b) In the D2L course ...
- Tasks to complete using Course Admin > External Learning Tools
- Tasks to complete using Assessments > Quizzes > Manage Quizzes
- Tasks to complete using Assessments > Quizzes > LockDown Browser
- Additional tasks to complete using Assessments > Quizzes > Manage Quizzes
- Task to complete using Communication > Classlist
(c) Making the exam available to students
(d) Reviewing exam videos
(e) Vendor documentation
(f) Getting Help
(a) In the LON-CAPA course ...
i. Tasks to complete using the Course Editor
- Select the Course Editor and add a new folder (e.g., Exam 1).
- Check the "Hidden" and "URL Hidden" checkboxes for the new folder
- Add problems to the folder
- Click the Content Utilities tab
- Click "Display/Set Shortened URLs for Deep-linking"
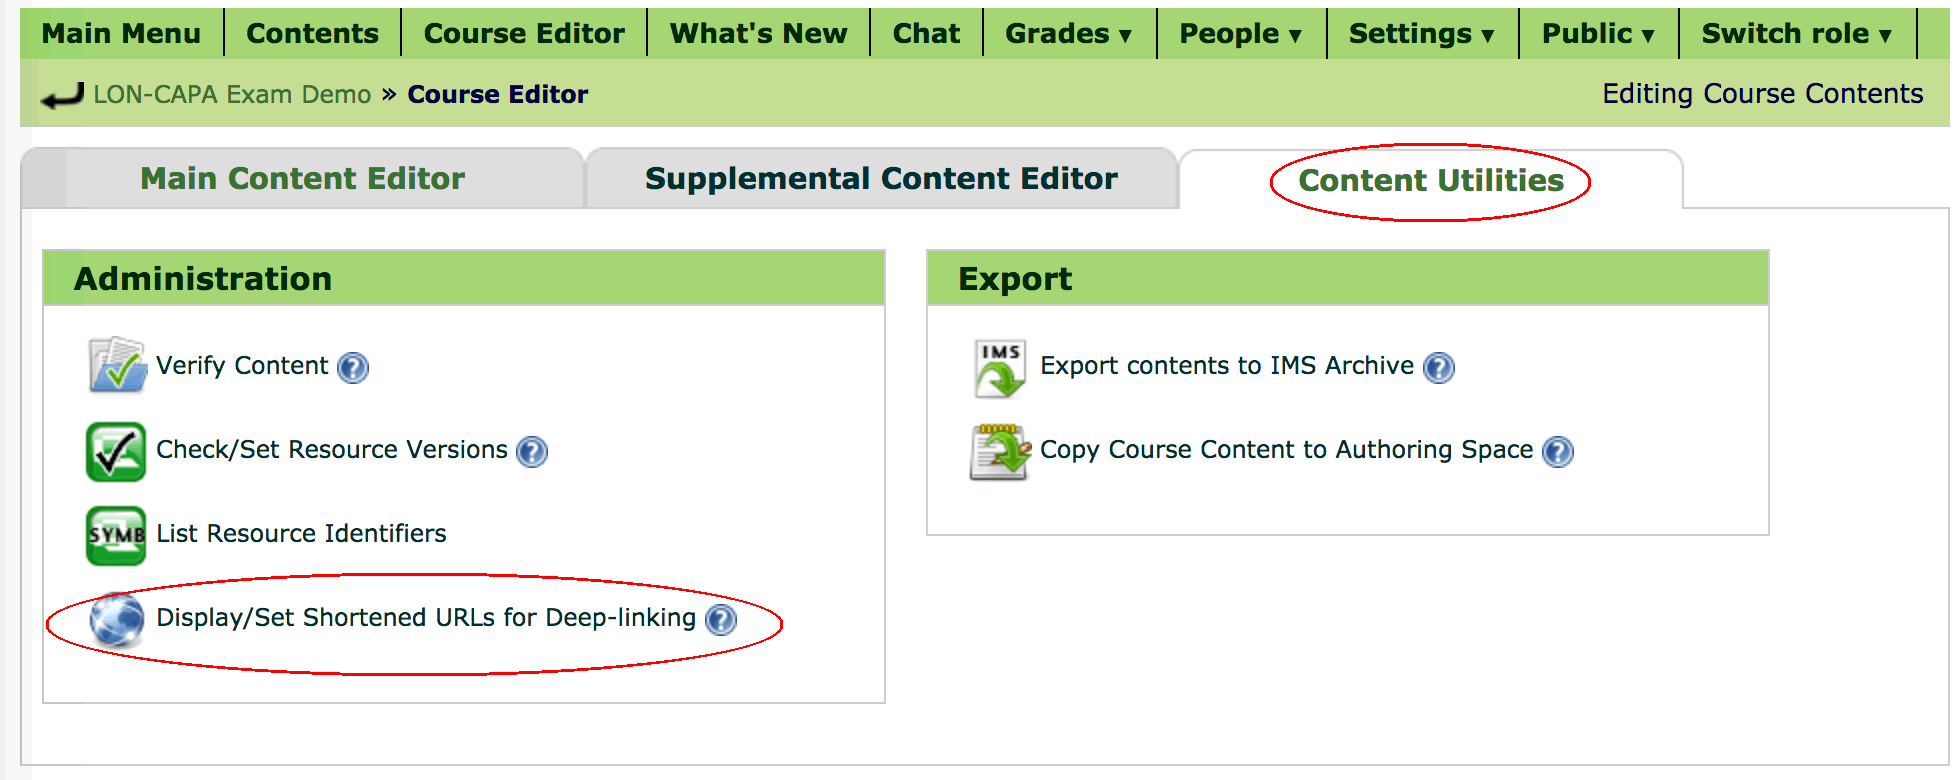
- Check the checkbox for the exam folder and push "Create Tiny URL(s)"
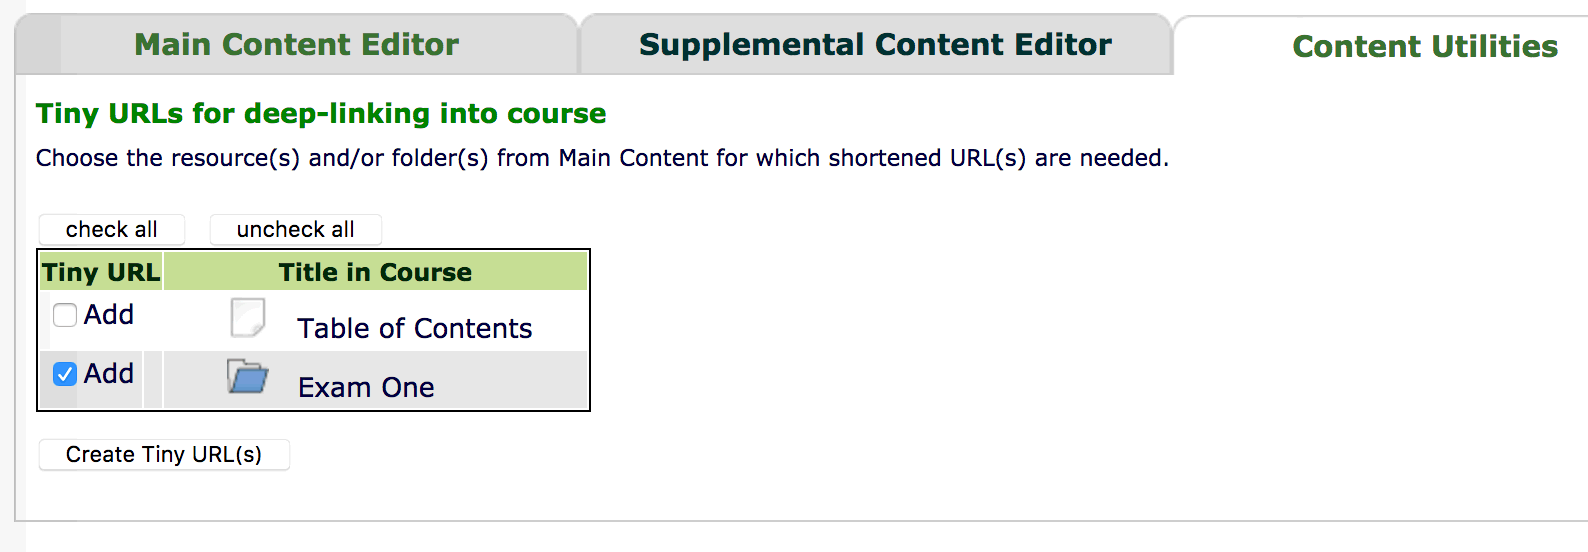
- Record the unique URL, of the form: /tiny/msu/<identifier>
- Exit the Course Editor
ii. Tasks to complete using Settings > Course Settings
- Check the checkbox for "Menu display" and then configure the items to display when LON-CAPA is being used within the Respondus LockDownBrowser.
- Check the "Add" checkbox to add a new (numbered) menu collection.
The recommendation is for only four checkboxes to be checked, with all others unchecked, so the menu will just include:- Header line with Fullname in the header text (on left)
- Footer line with Feedback in the footer text (on right)
If you prefer not to receive feedback from students in LON-CAPA, you could also uncheck the checkboxes for "Display footer" and "Feedback".
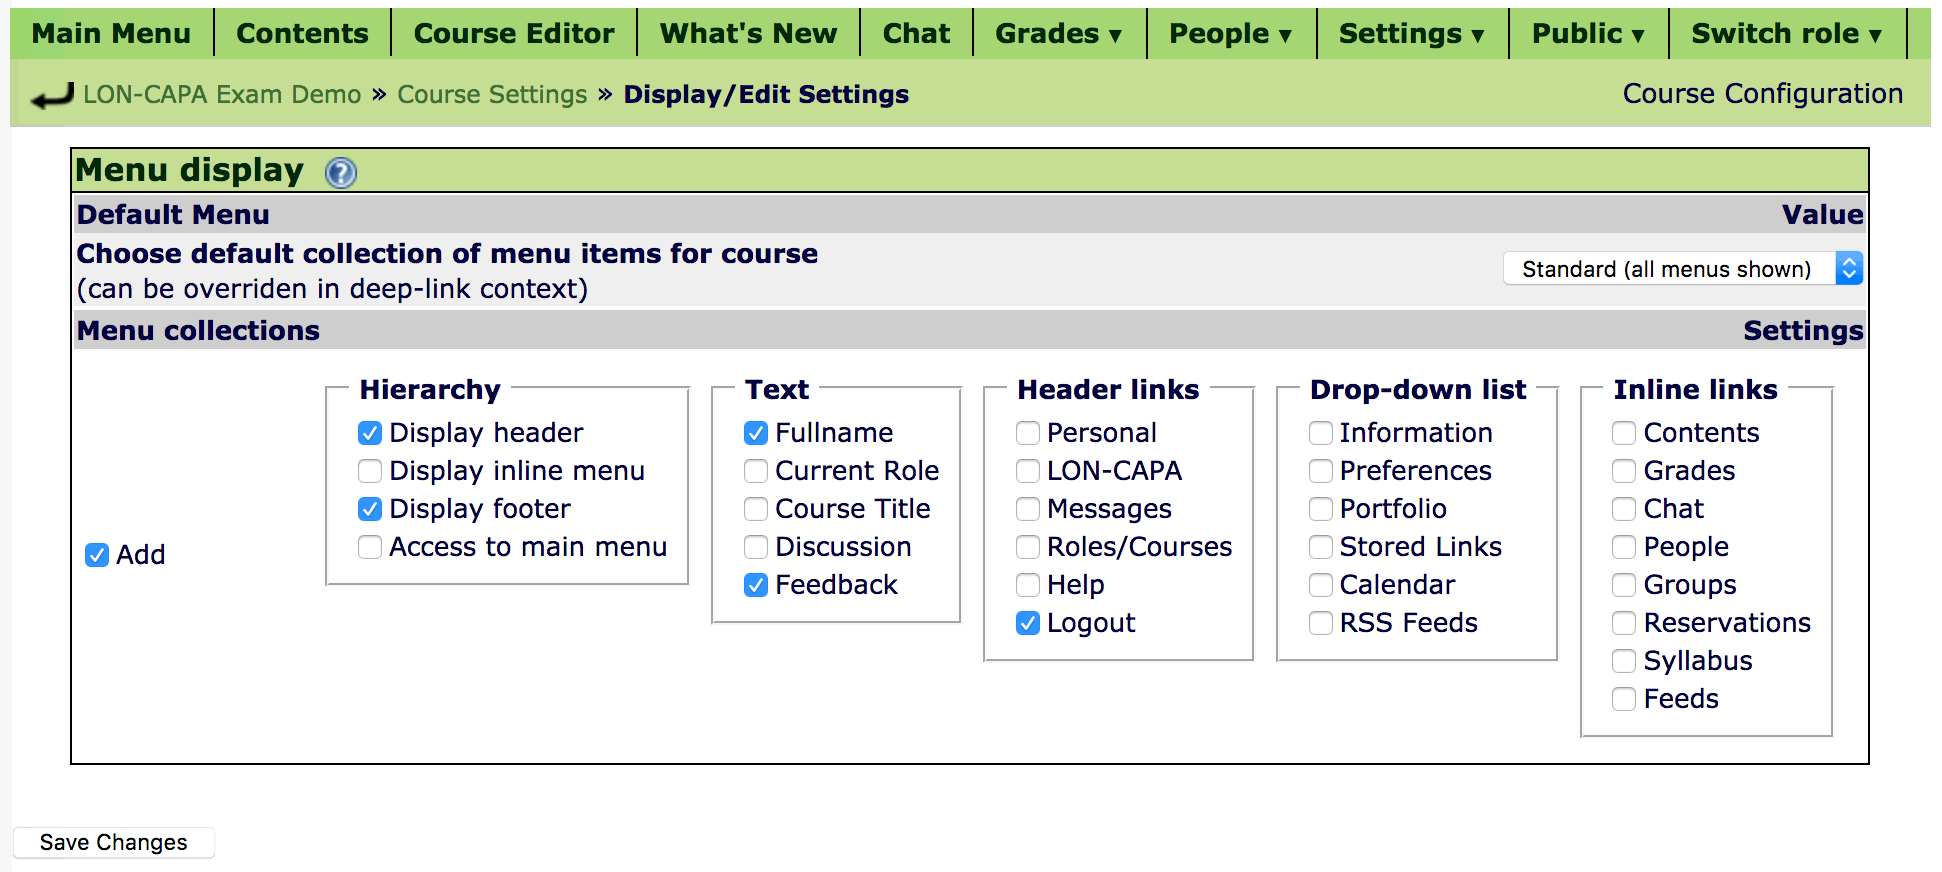
- Push "Save Changes"
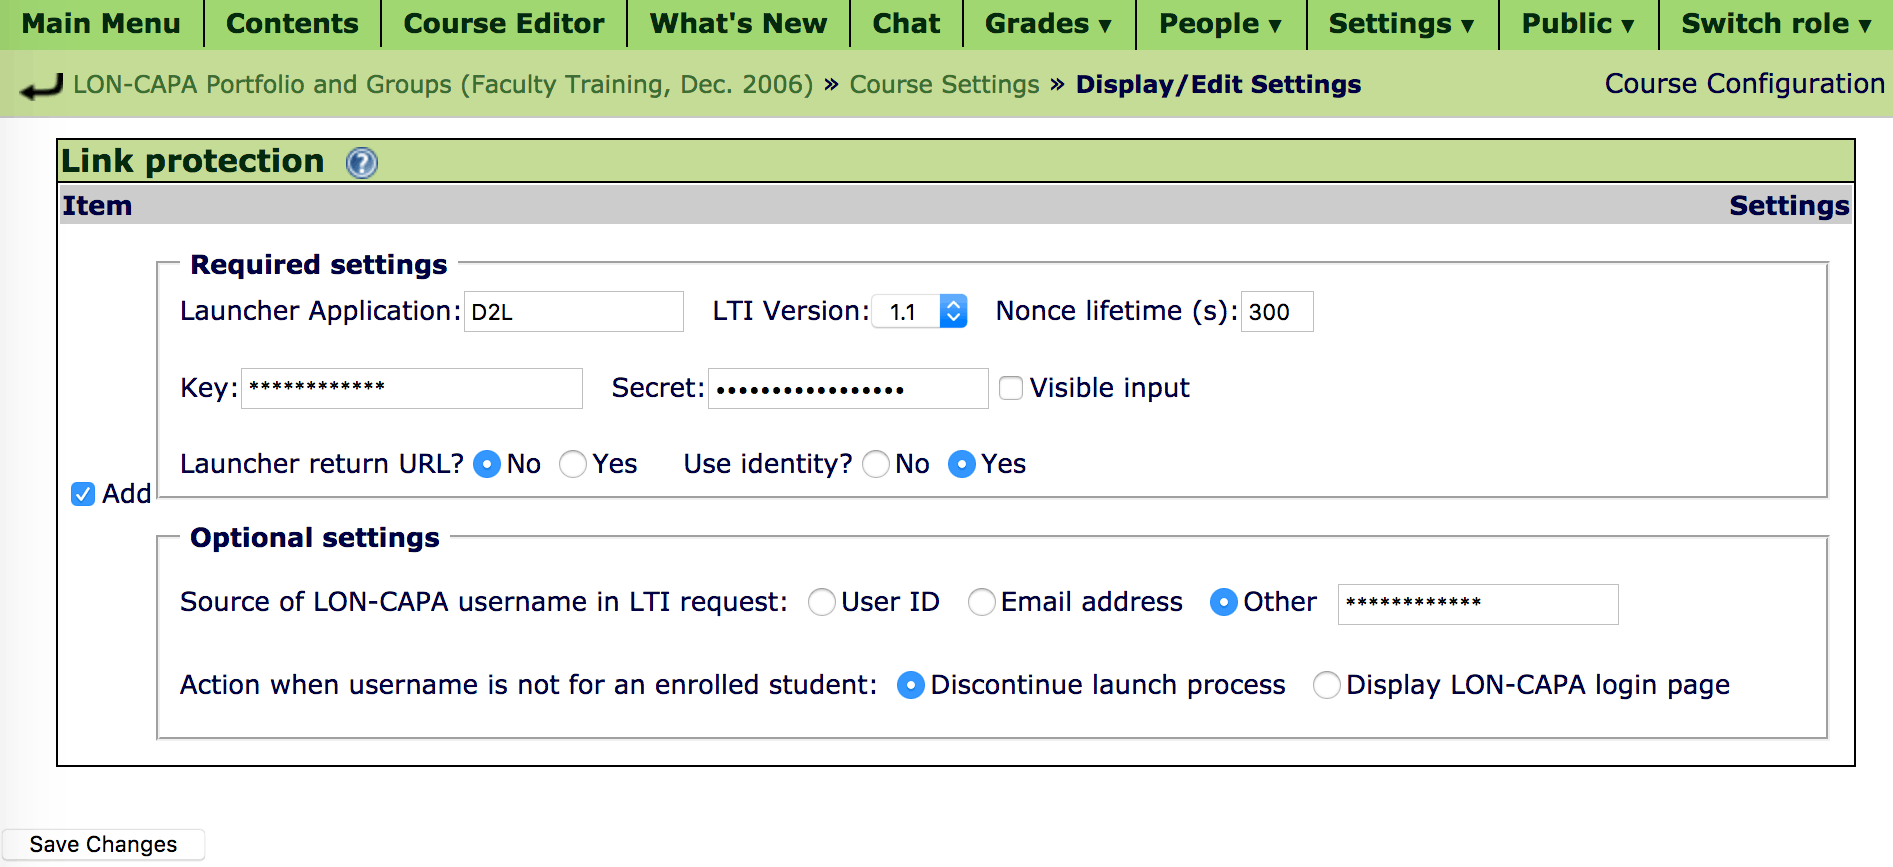
- Return to the "Settings to display/modify" screen, and check the checkbox for "Link Protection" then push "Display"
- Check the "Add" checkbox to add a new launcher with its own unique key and secret.
The key and secret will need to be used in D2L when configuring an external learning tool item for the LON-CAPA exam.
Once a secret has been saved for a particular launcher, LON-CAPA will not display it again, so it is recommended to make a note of it, so you will have it available for use in D2L. Once saved, if you return to the "Link Protection" display in your LON-CAPA course you will be able to change the existing Secret to a new one.
The launcher name will be shown in LON-CAPA in the drop-down list for "Course LTI launch" when configuring the deeplink parameter at an enclosing map/folder level for a problem in the exam folder.
Click the "Yes" option for "Use identity?" if you plan to include a student's username in the D2L launch, so a student will not need to re-authenticate after following the link to the LON-CAPA exam. You will specify the source of the usename in the LTI request created by D2L and the action to take in the event that the username does not match that of a student enrolled in your LON-CAPA course. A Domain Coordinator will know what to put in the "Other" textbox.
iii. Tasks to complete using the Parameter Manager
- Click Contents in the inline menu to display the course contents, then open folders etc., and click on the first problem in the exam folder.
- Click "Content Settings" in the Functions menu above the display of the problem to display the large table of parameter settings.
- You will want to set parameters for the following:
- Problem Opening Date (opendate) – set the start date of the window for exam access
- Problem Due date (duedate) – set the end date of the window for exam access
- Time-Limit (interval) – set the default for the time students should have for all questions
- Question Type (type) – set the type to exam, if preferred to use radio buttons
- Show Problem Status (problemstatus) – set to No, don't show correct/incorrect feedback
- Discussion End Time (discussend) – set to a date in the past
- Hide Closed Discussion (discusshide) – set to Yes
- Number of bubbles in exam mode – if questiontype is exam, set desired number of bubbles
- Deep-linked items (deeplink) – set the six component settings (see below)
- Hide buttons from students – set to Yes to not show icons on right of inline menu (except countdown timer)
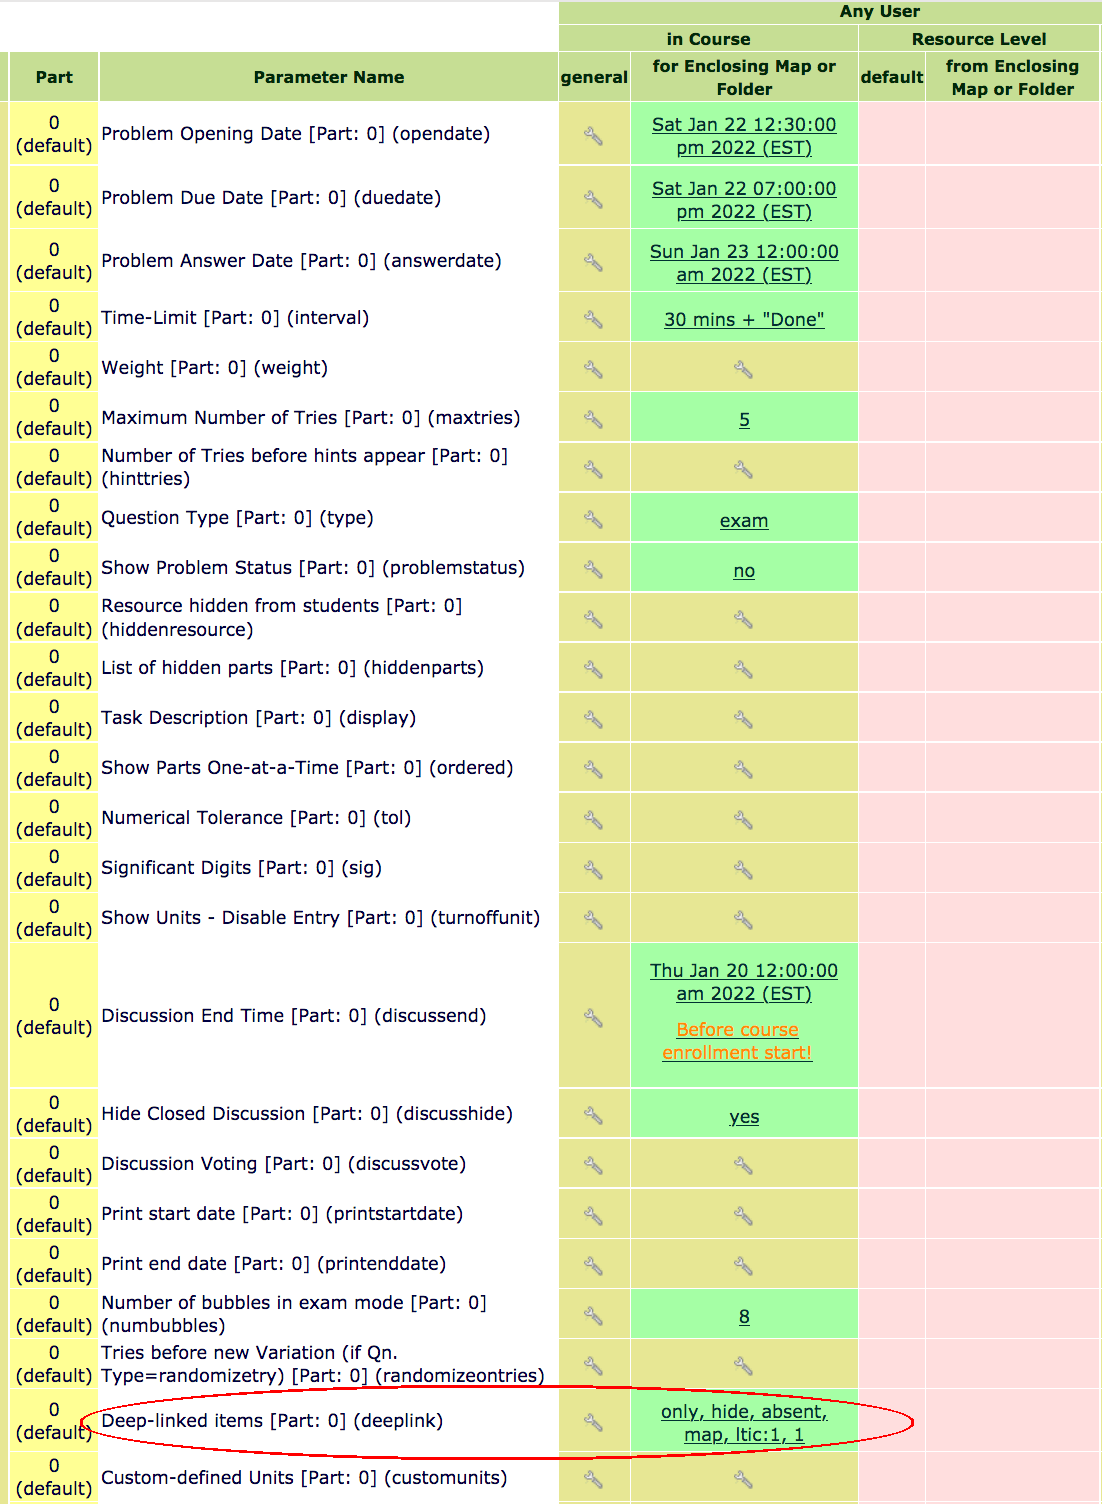
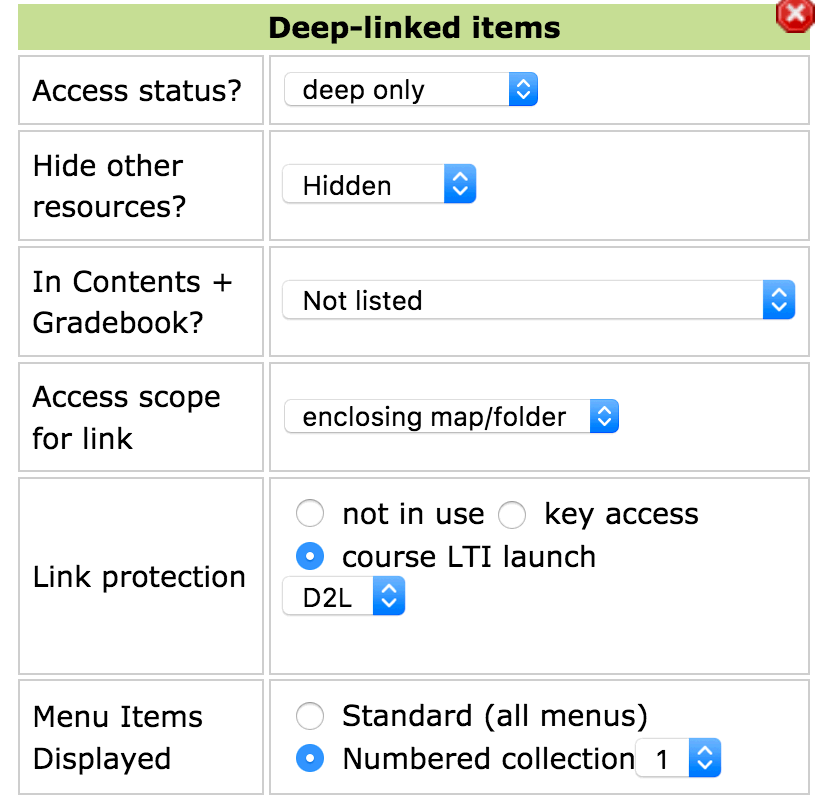
- For the "Deep-linked items" parameter you will specify eight separate settings
- Access status – set to: "deep only"
- Hide other resources? – set to "Hidden"
- In Contents + Gradebook – set to "Not listed"
- Access scope for link – set to enclosing map/folder
- Link protection – set to course LTI launch (and select the name of the launch item you set in Settings > Course Settings > Link Protection
- Menu Items displayed – set to Numbered collection, and select the number of the menu collection you set in (a) ii.2 above.
- Embedded - set to Embedded if D2L will display the LON-CAPA window embedded within the D2L page
- Exit Button – set to in use, redirect to URL if you set "Launcher return to URL" to Yes, when configuring Link Protection, see (a) ii.5 above.
iv. Tasks to complete using People > Users > Add/Modify a Student
- A "demo student" user with a unique username with the format: DemoStudent_1234567 is enrolled in every D2L course at MSU. To facilitate testing launch of the LON-CAPA exam from the D2L quiz you should enroll that user as a student in your LON-CAPA course. You can see the unique username D2L assigned to this demo student in your D2L course by using: Communication > Classlist, and searching for "Demo". (In your LON-CAPA course you may want to assign this student to a LON-CAPA section that is not a section which contains real students).
- Usernames for user accounts which you create in LON-CAPA for fictitous students (such as the DemoStudent) must be more than 8 characters to avoid conflict with past, present or future MSUNetIDs.
- The exam folder should currently be hidden. To facilitate testing with Respondus LockDown Browser and/or Monitor
(see below), it is recommended that you override the hidden status of the Exam folder by using the Parameter Manager
to explicitly set that to unhidden for just this one "Demo" student.
One way to do that is:
- Display the course contents, then open folders etc., and click on the first problem in the exam folder.
- Click "Content Settings" in the Functions menu above the display of the problem to display the large table of parameter settings.
- In the "Additional Display Specification (optional)" box above the large table of parameters enter the username of the "Demo" student.
- Push "Update Display"
- Additional columns will be added to the large table of parameters.
- In the group of column with the header: User <"Demo" user username> at Domain msu, immediately to the left of the "Parameter in effect" column, click the wrench icon in the "for Enclosing Map or Folder" column for the "Resource hidden from students" (hiddenresource) row, In the pop-up window check the "No" radiobutton and click "Save"
Note: depending on how open dates are set for all students, you might also need to set an open date to the current date/time specifically for just this one student also.
(b) In the D2L course ...
i. Tasks to complete using Course Admin > External Learning Tools
- Click "Manage Tool Links (Legacy)"
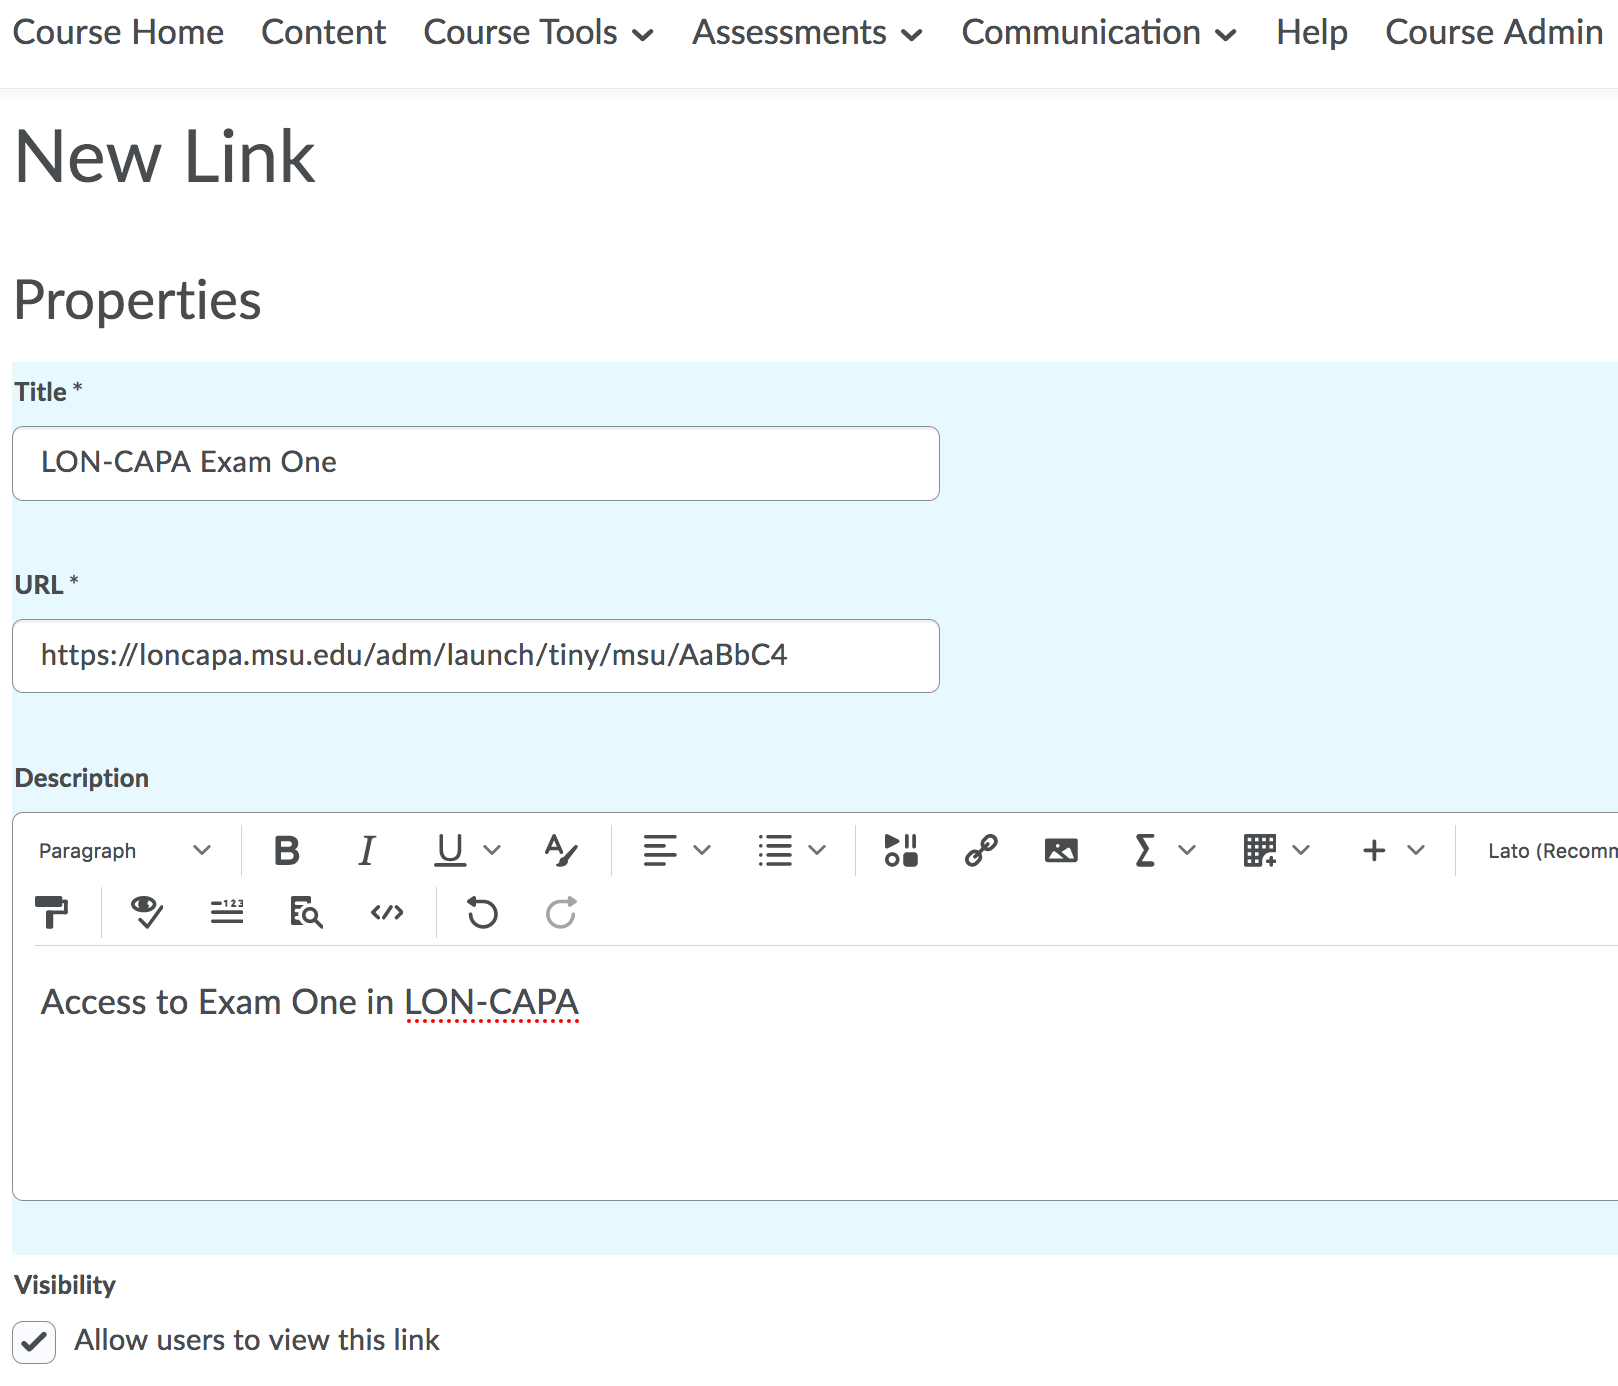
- Click "New Link".
- In "Properties" enter information in the textboxes for Title, and URL and check "Allow users to view this link" checkbox.
The URL will begin: https://loncapa.msu.edu/adm/launch/tiny/msu/ followed by the unique <identifier> for the exam folder, created in the LON-CAPA course – see (a) i.7 (above).
- In "Key/Secret" check "Sign messages with key/secret with" checkbox and the "Link key/secret" radio button. Enter a unique key and secret.
- In "Security Settings" check the radio button for Use link security settings. The checkboxes for data to include in the payload sent on launch can all be left unchecked with the exception of: "Send system username to tool provider", which should be checked, if you set "Use Identity?" to "Yes" in the Link Protector configuration in LON-CAPA, and want to eliminate the need for a student to re-authenticate when following the LON-CAPA exam link from the D2L quiz.
- Check the checkbox to make the link available in the course (i.e., Current Org Unit).
ii. Tasks to complete using Assessments > Quizzes > Manage Quizzes
- Click "New Quiz"
- In the "General" section enter a name in the Name textbox and click "Add/Edit Questions"
- Use Add > New Question > True or False to add a new question.
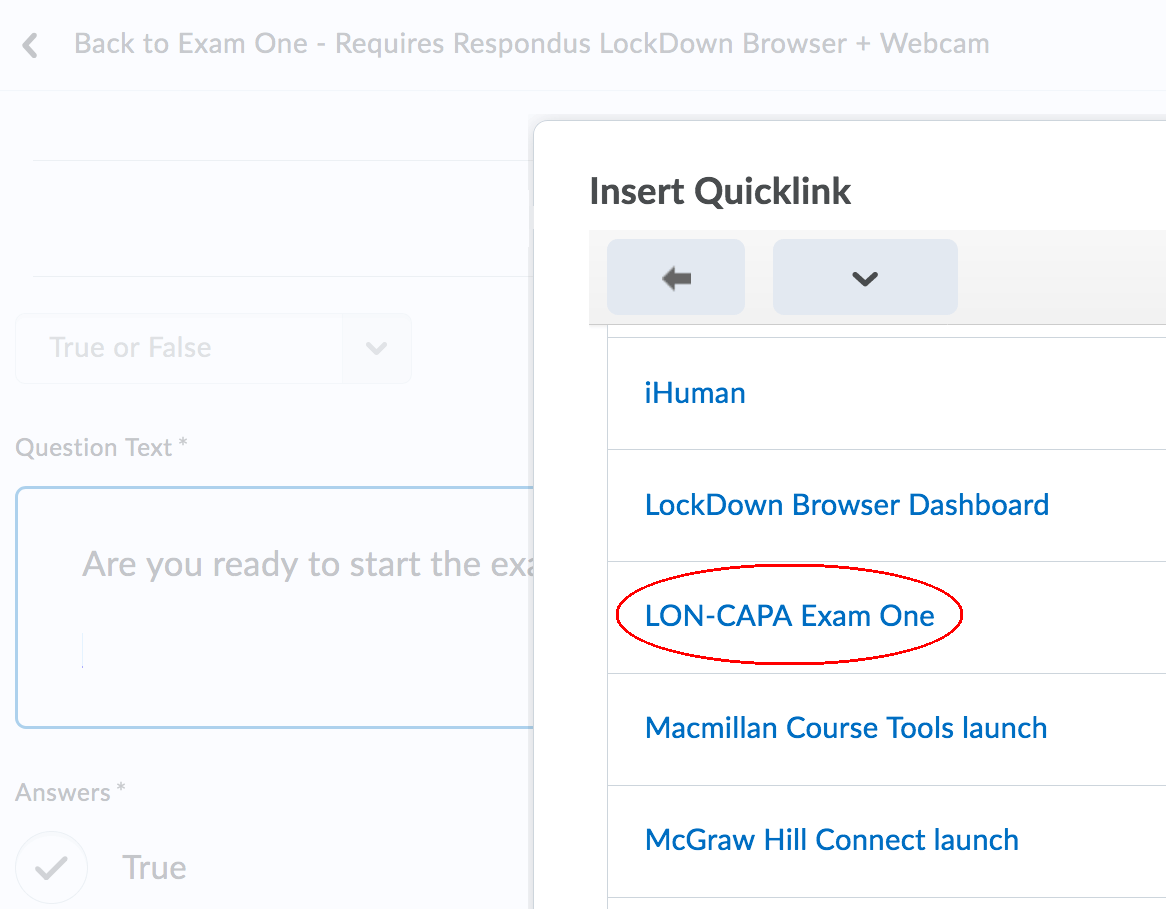
- Click within the textbox for the question text and enter: Are you ready to start the exam? If so, click the link below. Then use + ∨ to display the menu to add items, and select "Insert Quicklink"
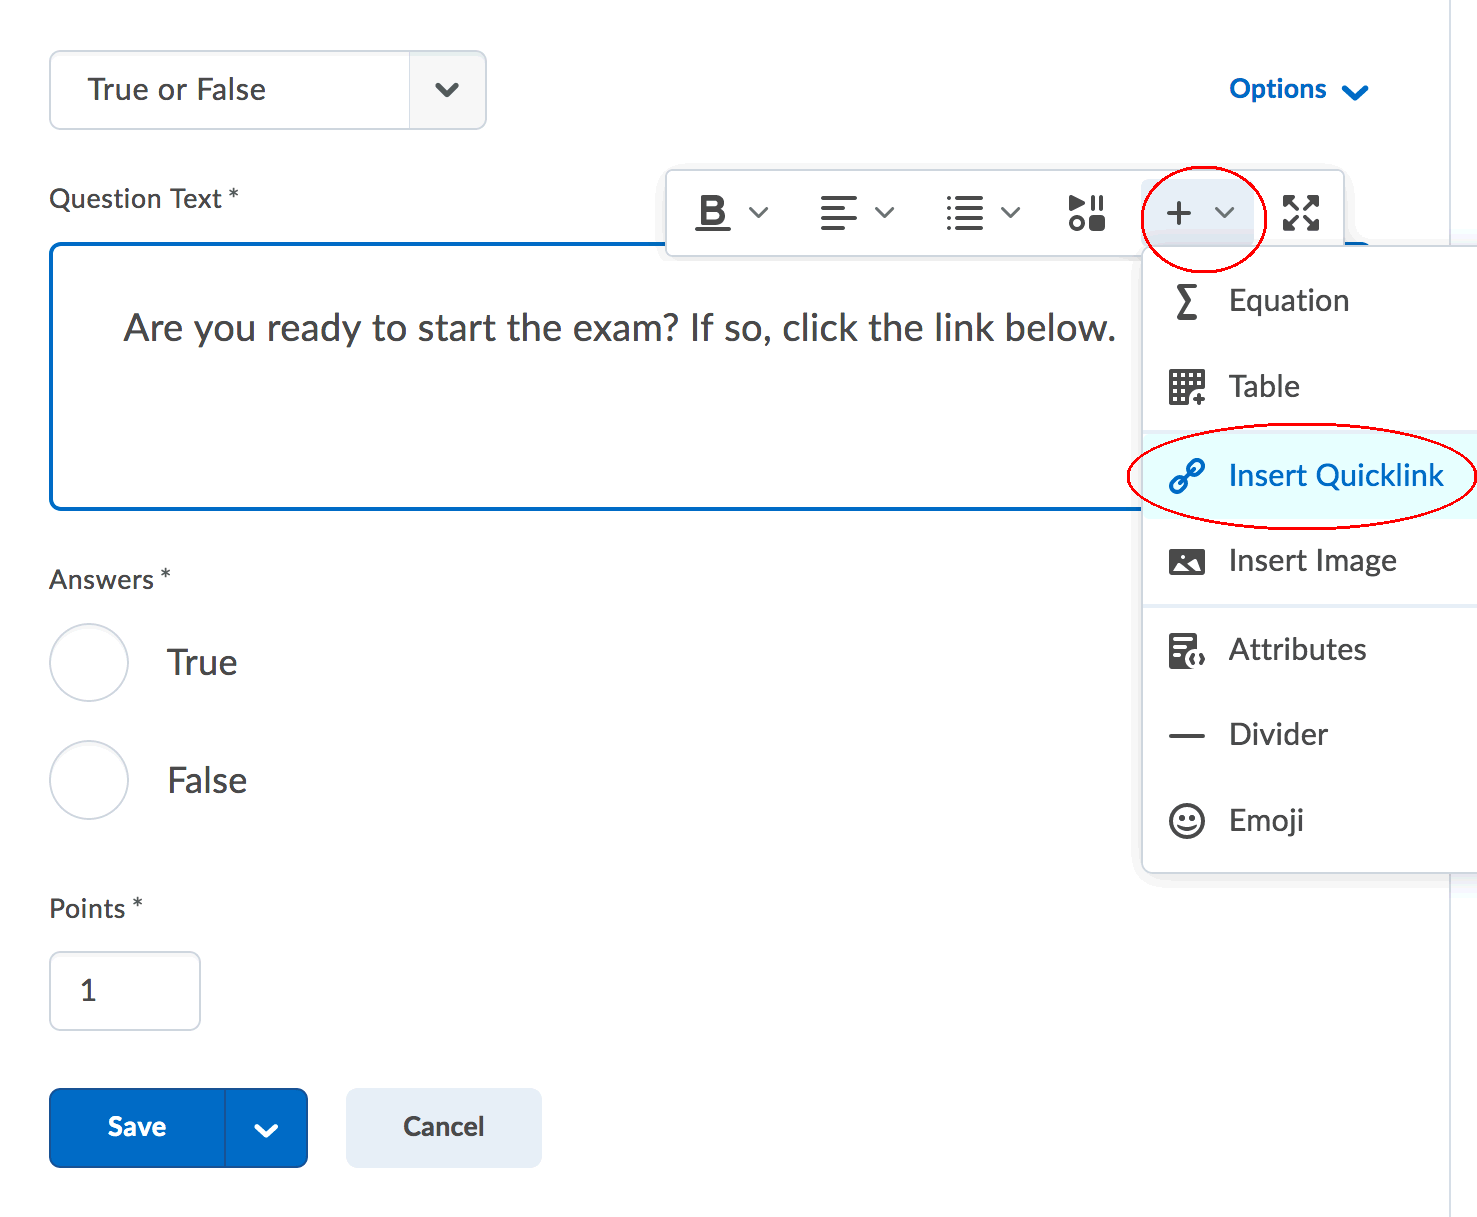
- In the pop-up window scroll to "External Learning Tools" and select that, and then scroll to find the LON-CAPA quiz item created in (b) i.2 (above).
- In the Answers check "True" and click "Save".
iii. Tasks to complete using Assessments > Quizzes > LockDown Browser
- Proceed to the Respondus LockDownBrowser Dashboard
- In the Quizzes list you should see the Quiz you created in (b) ii. Click the ∨ to the left of the name to select "Settings".
- In "LockDown Browser Settings" check the "Require Respondus LockDown Browser for this exam" radio button.
- Click the + Advanced Settings to expand that item and check the "Allow access to specific external web domains" checkbox. Enter the following:
login.msu.edu, auth.msu.edu,
loncapa.msu.edu, s1.lite.msu.edu,
s2.lite.msu.edu, s3.lite.msu.edu,
s4.lite.msu.edu, s5.lite.msu.edu,
s6.lite.msu.edu, s7.lite.msu.edu,
s8.lite.msu.edu, s9.lite.msu.edu,
s10.lite.msu.edu, lon-capa.msu.edu
- Check the "Require Respondus Monitor (automated proctoring) for this exam" radio button.
- Push Save + Close
Note: Additional options are available for both LockDown Browser (e.g., allow use of an iPad etc.) and Respondus Monitor (e.g., Webcam check and Facial Detection).
iv. Additional tasks to complete using Assessments > Quizzes > Manage Quizzes
A "demo student" user is enrolled in every D2L course at MSU, so once everything has been set up in both D2L and LON-CAPA launch of the quiz can be tested by impersonating that user.
- In the table of quizzes click the ∨ to the right of the quiz name and select "Make visible to users"
v. Task to complete using Communication > Classlist
- Enter: Demo in the Search box, and click the search icon.
- The user assigned a role of Demo Student should be listed; click the ∨ to the right of the student's name: Student, Demo and select "Impersonate".
- Use Assessments > Quizzes to list available quizzes, and click on the quiz created in (b) ii. above to enter the quiz.
- If you have not already downloaded the LockDown Browser application for your device click the link: "Download and install the latest version of LockDown Browser".
- Once you have an up to date version of LockDown Browser installed push the "Launch LockDown Browser" button.
- Push the "Start quiz" button, and the push the "Agree" button to agree to the Respondus LockDown Browser terms of use.
- After you have completed the required Webcam checks, push the "Begin Exam" button.
- Click the link to the exam which you included in the D2L quiz question in (b) ii.4 (above).
- A new tab should open in the LockDown Browser containing the destination page in LON-CAPA.
(c) Making the exam available to students
Use the Course Editor in LON-CAPA to uncheck the "Hidden" checkbox for the exam folder in the LON-CAPA course.
(d) Reviewing exam videos
It can take up to 12 hours for the video of a student's exam session, as captured by Respondus Monitor, to be available for review.
Within the D2L course, use: Assessments > Quizzes > LockDown Browser to display a list of quizzes. Click the ∨ to the left of the name and select "Class Results" to display a class roster with information about exam sessions. The Review Priority column will include either Low, Medium or High for each student who has pushed "Begin Exam" after completing the pre-exam checks. A green-to-red bar in the same column provides a visual summary of the quantity and severity of any flagged events, detected by the algorithms used by Respondus Monitoring for automated proctoring.
Clicking [+] to the left of a student's name will display details for that student, including a summary of key data, a list of flags, access to video playback and controls, a timeline with flags and milestones, and thumbnail images from the video.
(e) Vendor documentation
- Vendor-supplied information for Respondus LockDown Browser
- Vendor-supplied information for Respondus Monitor
(f) Getting Help
If you need additional help, submit a help request.
(Top)